Creating a Step-by-Step Guide to Mounting Vertical Gardens on Brick, Concrete, and Glass Walls helps turn any wall into a fresh and vibrant green space. Each surface type needs a specific method to support the garden safely and effectively. Knowing these differences makes all the difference.
This guide offers clear and practical instructions, whether you’re working with an outdoor wall or planning a modular vertical garden for gourmet balconies. Even limited spaces can support thriving plants when installed the right way. No guesswork, just smart planning.
If your goal is to mix beauty, safety, and function, you’re in the right place. From prepping the wall to choosing materials and mounting systems, we’ll walk through it all. Let’s begin your vertical garden journey the right way.
Step-by-Step Guide to Mounting Vertical Gardens on Brick, Concrete, and Glass Walls: Understanding the Basics
Mounting a vertical garden calls for more than good design taste. It starts with knowing the surface you’re dealing with. Brick, concrete, and glass each demand a different approach when it comes to support, moisture handling, and hardware.
If you skip this step, you risk not only poor results but also long-term damage to the wall or the structure. This is especially important in gourmet balconies, where limited space requires smart and secure choices. A strong foundation starts with understanding the basics.
Key points to evaluate before installation:
- Wall material assessment: Know the surface type to select the right anchors or mounting system.
- Weight calculation: Estimate the total load, including plants, wet soil, water, and support frames.
- Access and sunlight: Check which areas receive the best light and are easy to reach for care.
These first decisions will shape your entire setup. With this clarity, you’ll be ready to select tools, frames, and plants that match your space and your wall’s strength.
Choosing the Right Structure for Each Wall Type
Not all walls are created equal — and neither are vertical garden systems. The surface you’re working with will directly influence the materials, tools, and installation method required.
That’s why choosing the right structure based on the wall type is one of the most important steps in any successful vertical garden project.
A mismatched combination of frame and wall surface can lead to poor stability, water retention issues, or even long-term wall damage. To avoid these problems, it’s essential to understand how different surfaces behave under pressure, humidity, and weight.
Here’s how to pair each type of wall with the most suitable structure:
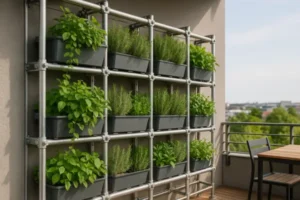
For Brick Walls
- Use expansion anchors or masonry screws to secure the modules without cracking the bricks.
- Select frames or panels that leave a small gap between the module and the wall, allowing air to circulate and moisture to evaporate.
- Always inspect the wall for loose bricks or mortar damage before drilling. Reinforce weak areas before starting the installation.
For Concrete Walls
- Apply heavy-duty sleeve or wedge anchors, especially for gardens with heavier modules or irrigation systems.
- Use a hammer drill with a masonry bit to penetrate the surface safely and precisely.
- Consider using metal or treated wood backplates to distribute weight evenly and avoid concentrated stress points on the wall.
For Glass Walls
- Never drill directly into glass. Instead, choose freestanding metal or wood frames designed to stand slightly in front of the wall.
- In narrow spaces, you can use tension rod systems that press against the floor and ceiling without touching the glass.
- Always prioritize lightweight vertical garden modules such as soft-pocket planters or mesh panel systems, which reduce structural load and visual weight.
Understanding this alignment between wall type and support structure ensures your installation is not only beautiful but also durable and safe.
This is especially important in high-rise buildings or balconies exposed to wind and changing weather conditions, where any weak point can become a risk. By choosing the structure that respects your wall’s characteristics, you set a solid foundation for a thriving vertical garden.
Essential Tools and Materials You’ll Need
Every successful vertical garden starts with proper planning — and the right tools. Whether you’re mounting on brick, concrete, or using a freestanding frame for glass, your toolkit will influence the quality and ease of the installation.
This is especially true for compact and stylish areas like gourmet balconies, where precision and clean finishes matter.
Before starting, make sure you have all the equipment ready. Rushing to find missing tools mid-project can lead to mistakes or shortcuts. A few extra minutes of preparation will save hours of rework later and help ensure your wall remains safe and beautiful.
Here’s what you’ll need for a smooth installation:
- A power drill with a masonry bit, strong enough to penetrate brick or concrete without damaging the wall
- A level and measuring tape, essential for marking straight and evenly spaced anchor points
- The correct anchors and screws, always selected based on your specific wall material
- The modular panels, pockets, or planters that make up the core of your vertical garden
- A waterproof backing, particularly important if moisture could reach the wall surface
- Safety goggles and gloves, to protect your eyes and hands from debris or dust
- A pencil or chalk to make temporary marks while planning layout and anchor placement
If you’re adding a watering system, you may also need basic irrigation lines, drip nozzles, or a timer for automated watering. These additions are optional but helpful, especially for those who travel often or simply want lower-maintenance care.
Once your tools are in place, take a few minutes to test the layout on the wall. Lay out the modules on the ground first, double-check distances, and confirm alignment using your level.
This small preparation step helps prevent installation errors and gives you a clear visual plan before making anything permanent.
How to Prepare the Surface Before Installation
Proper surface preparation is essential to ensure your vertical garden lasts long and stays secure. Skipping this step can lead to structural problems or even plant damage later on.
For Brick and Concrete Walls
- Clean the surface: Remove dust, paint chips, or moss that could interfere with the anchors.
- Mark anchor points: Use a pencil and level to align holes accurately.
- Inspect for cracks: Avoid drilling near large cracks or weak points.
For Glass Surfaces
- Measure carefully: Since you won’t be drilling, precision is key.
- Install floor-based supports: These should rest securely on the floor and extend upward.
- Protect the glass: Use rubber bumpers or padding where the frame touches the glass.
Never underestimate how important a solid foundation is. Even the most beautiful vertical garden will fail if it’s not securely mounted.
Mounting the Frame: Step-by-Step Instructions
This is the heart of the installation process — where your vertical garden truly begins to take shape. Whether you’re working with a brick wall, a solid concrete surface, or a glass panel that needs a freestanding frame, each type requires a different approach.
Proper mounting ensures your structure will support plant weight, resist movement, and last over time.
Before drilling or positioning anything, double-check your layout. Use your pencil and level to mark the exact points where the frame or modules will be fixed. This planning phase helps prevent crooked alignment and keeps the garden looking organized and intentional.
Once you’re confident, follow the steps suited to your wall type. Here’s how to mount the frame securely for each kind of wall:
Brick Wall Installation
- Drill carefully at the marked points using a masonry bit, going just deep enough to fit the anchors snugly
- Insert masonry anchors into the holes, tapping gently to avoid cracking the brick face
- Position the mounting frame or brackets and attach them using heavy-duty screws
- Use a level throughout the process to maintain proper alignment, tightening the screws only after confirming positioning
Concrete Wall Installation
- Use a hammer drill to make clean holes in the surface, keeping the drill steady to avoid shifting
- Place sleeve or wedge anchors into the drilled holes to provide strong grip and weight resistance
- Secure the frame in place, making sure each corner is equally tightened for balanced support
- If your vertical garden is large, consider using support plates or rails to distribute the load more evenly and reduce stress on specific points
Glass Wall Setup
- Do not drill or place pressure directly on the glass
- Instead, assemble a freestanding frame, ideally made from treated wood or metal for weather resistance
- Position the frame just in front of the glass, ensuring the base is wide enough to prevent tipping
- If needed, stabilize the structure with vertical tension rods that press gently between floor and ceiling
- Once secure, attach your lightweight garden modules such as mesh panels or fabric pockets onto the front-facing side of the frame
No matter the wall type, always test the structure once mounted. Apply light pressure in different directions to ensure stability. If there is any shifting, reinforce with additional anchors or side brackets before adding plants.
A strong, balanced frame is what will keep your vertical garden safe and beautiful over time.
Installing the Garden Modules
With the frame firmly in place, it’s time to bring life to your vertical garden by installing the modules that will hold your plants. This is the step where functionality e design come together — the visible, green layer that defines the mood and personality of your space.
There are many types of modules available, and your choice will depend on the structure you’ve installed, the type of wall, and the look you want to achieve. Some are more flexible and easy to change over time, while others offer a more permanent and refined finish.
The most common options include:
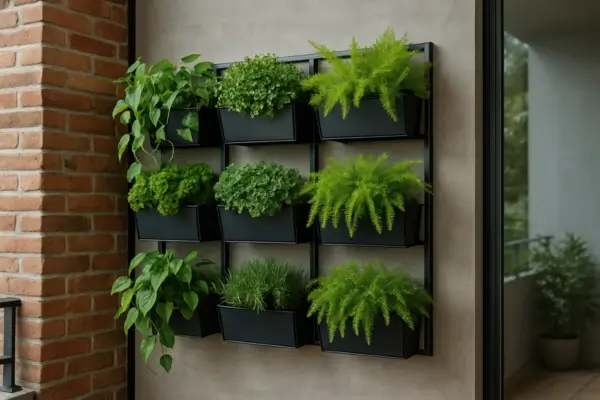
- Modular panel systems: These rigid panels are attached with screws or metal hooks and often support pots or planting cells. They’re stable and work well for structured designs.
- Pocket systems: Made from felt or breathable fabric, these lightweight solutions are ideal for herbs, lettuces, or cascading plants. They’re easy to rearrange and often less expensive.
- Wall-mounted planters: These individual containers are fixed directly to the wall or to the frame. They offer a classic look and allow for deep-root plants, but require strong anchors and careful spacing.
Before fixing the modules, take a moment to visualize the layout. Start from the bottom and work your way up, checking alignment at every level. Place heavier or bulkier modules closer to the base for better balance and load distribution.
As you install, keep in mind:
- Leave enough space between plants to ensure healthy airflow and prevent mold or rot.
- Align modules based on sunlight exposure — taller plants can provide shade, while herbs often prefer direct light.
- Watch the weight distribution carefully. Modules on the top rows should be lighter or smaller to reduce strain on the frame.
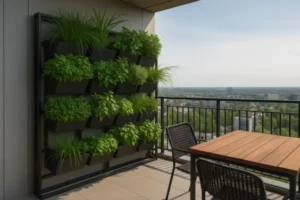
If you’re building a modular vertical garden for gourmet balconies, this is your chance to combine elegance with utility. Use fragrant herbs like rosemary and thyme near dining areas, and alternate textures with cascading greens like ivy or ferns.
A good mix brings both freshness and beauty — and makes your garden a living part of your space.
Watering and Drainage Considerations
Water management is key to the longevity of your vertical garden — both for the plants and your wall.
Irrigation Tips
- Use a drip system for consistent moisture.
- Install a timer for automated watering.
- Choose soil that retains moisture but drains well.
Drainage Tips
- Add drain trays at the bottom of each module.
- Protect the wall with waterproof backing if necessary.
- Avoid overwatering, especially near power outlets or enclosed balconies.
A smart watering system keeps your plants healthy and reduces the need for constant care.
Design Tips for a Stylish and Functional Vertical Garden
Designing a vertical garden is more than arranging plants on a wall — it’s about creating a living experience. A green retreat that blends beauty, comfort, and intention. On a gourmet balcony, every detail matters, and smart design turns limited space into something truly special.
Think of your wall as a canvas. By combining plants with different textures and shades of green, you add depth and motion to the space. Mix tall, upright species with trailing ones that cascade downward. This contrast draws the eye and brings visual rhythm to your garden.
Scent plays a quiet but powerful role. Place aromatic herbs like basil, mint, or rosemary near seating areas. Their fragrance adds a fresh, calming presence — and they’re practical, too, just steps away from your kitchen or outdoor grill.
Lighting is where design meets mood. Soft LED strips behind the plants or warm spotlights aimed upward can transform your garden at night. It becomes more than a green wall — it becomes a glowing feature that adds charm to your evenings.
Make access part of your design. Keep high-maintenance or edible plants at arm’s reach. Save the top rows for resilient species that don’t need daily care. This thoughtful arrangement makes watering, trimming, and harvesting easy and enjoyable.
When well-designed, a vertical garden does more than decorate — it invites you in. It cools the air, softens the space, and gives you a moment of nature every time you step outside. It’s not just about style. It’s about living with more life around you.
Maintenance and Seasonal Adjustments
Once your vertical garden is in place, the real magic begins — and so does the care it requires. While maintenance isn’t complicated, a little attention now and then goes a long way in keeping your plants thriving and your system working smoothly, season after season.
Start with a simple visual check every few months. Look over the mounting frame and anchoring points to make sure nothing has rusted or shifted out of place. This helps avoid long-term damage and ensures your garden remains safely attached to the wall or frame.
Caring for the plants themselves is just as important. In dusty urban areas, gently wiping the leaves with a damp cloth helps them breathe better and look healthier. Over time, it’s also a good idea to rotate certain plants to give them equal exposure to sunlight and promote even growth.
Soil care matters more than many people realize. Replacing or refreshing the soil mix once or twice a year keeps nutrients balanced and roots strong.
And as the garden matures, don’t hesitate to trim back overgrown stems or remove dead leaves. This encourages air circulation and prevents pests or mold from forming.
Changing seasons bring changing needs. More sun in summer may call for extra watering, while cooler months might mean moving heat-sensitive herbs indoors. Be flexible. Swap out plants as needed and adjust your watering schedule based on temperature and humidity.
By building a maintenance rhythm that fits your lifestyle, you’ll not only protect your investment — you’ll enjoy a garden that grows with you all year long. It becomes a living part of your space, responding to the seasons just like you do.
Energy-Efficient Lighting for Vertical Gardens
Lighting is one of the most underrated elements of a vertical garden — but it has the power to completely transform how the space feels and functions. Especially on shaded balconies or indoor areas, the right lighting does more than showcase your plants — it helps them grow.
If your garden receives limited natural light, using LED grow lights can support photosynthesis while keeping your energy bill low. These lights are designed to mimic natural sunlight and are ideal for edible plants or herbs that need extra help indoors.
But lighting isn’t just practical — it’s part of the experience. Adding warm white spotlights creates a welcoming and relaxed mood during evening hours. This is especially effective on gourmet balconies, where dining and relaxation often go hand in hand with ambiance.
For an extra sensory layer, consider placing lights near aromatic herbs like mint or basil. At night, the gentle glow will highlight their texture and bring out subtle fragrances, making the space feel more alive.
You can also make the system smarter. Use motion sensors or timers to automate lighting, saving energy and avoiding unnecessary use. Just be sure that any lights you install are waterproof and built for outdoor conditions to ensure safety and durability.
When thoughtfully integrated, lighting becomes part of the garden itself — not just something you add later. It allows you to enjoy your green wall at any time of day, bringing comfort, visibility, and beauty to the moments you spend outside.
Frequently Asked Questions (FAQ)
Here are some common questions people ask when planning or installing a vertical garden. These quick answers can help you make better decisions and avoid common mistakes.
Can I install a vertical garden without drilling the wall?
Yes. You can use freestanding frames or tension rod systems that lean against the wall without needing screws. This is ideal for renters or delicate surfaces like glass.
Which plants grow best in vertical gardens on balconies?
Aromatic herbs like thyme, oregano, and parsley work well. So do trailing plants like pothos, ferns, and even cherry tomatoes if your balcony gets enough sun.
How much weight can a vertical garden structure hold?
It depends on the material of the wall and the type of mounting system. Always calculate the weight of wet soil, pots, and plant growth, and use reinforced anchors when needed.
Is it possible to install a vertical garden indoors?
Yes. Just make sure there is enough light or use grow lights. Also, ensure good drainage and protect the wall behind the structure.
What is the best irrigation method for vertical gardens?
A drip irrigation system with a timer is often the most efficient. It delivers consistent moisture with minimal waste and reduces daily maintenance.
Do vertical gardens damage the wall over time?
Not if installed correctly. Use waterproof layers behind the garden modules and ensure good ventilation between the plants and the wall.
Conclusion
Mounting a vertical garden on brick, concrete, or glass walls is more accessible than most people think. With the right knowledge, tools, and care, even a small balcony can become a living showcase of greenery and style.
This kind of setup is not only functional but also brings life and personality to compact spaces.
A modular vertical garden for gourmet balconies is more than decoration. It’s a smart use of vertical space, a source of fresh herbs, and a relaxing escape just steps away from your kitchen or living room.
By choosing the correct structure, preparing the wall properly, and selecting suitable plants, you set the stage for a long-lasting, beautiful garden.
If you’ve been waiting for the right time to start your garden project, this guide is your green light. Begin with one wall, stay consistent with care, and enjoy the results of growing something beautiful right at home.